Introduction to Python Notes – Class 9 AI (417) | Ultimate CBSE Guide
Scoring full marks in Python is easier than you think — here’s how!
These Introduction to Python Notes are specially designed for Class 9 AI students, presenting every concept in a simple and easy-to-understand manner. The notes help students grasp Python fundamentals quickly, build strong programming concepts, and gain the confidence needed to excel in exams.
These Python Class 9 Notes are not limited to theory alone. They include practical examples, solved programs, and multiple practice exercises for every topic, enabling students to develop their coding skills through hands-on learning. Whether you are preparing for examinations or learning Python for real-world applications, these notes provide the perfect balance of conceptual understanding and practical experience.
Start your Python journey today and make programming one of your strongest skills! 😊
Algorithm and Flowchart
How machine works?
Every machine, whether AI-enabled or not, performs tasks by following a set of instructions known as a program. These instructions guide the machine step by step to complete the task.
For example, a washing machine is designed to wash clothes and cannot perform unrelated tasks because it follows a predefined sequence of actions.
Write possible steps to wash cloths in a washing machine:
- Put the dirty clothes into the washing machine.
- Add detergent or washing powder.
- Close the machine door properly.
- Select the required washing mode.
- Fill the machine with water.
- Start the washing cycle.
- The machine agitates and cleans the clothes.
- Drain the dirty water.
- Rinse the clothes with clean water.
- Spin the clothes to remove excess water.
- Stop the machine after the cycle is complete.
- Remove the clean clothes from the machine.
Activity (Do It Yourself)
Write the possible steps to make Mango Juice.
How Are Programs Created for Machines?
- Identify the Task – Determine what the machine needs to do.
- Define the Goal – Clearly specify the main objective of the program.
- Break the Task into Smaller Steps – Divide the main task into manageable sub-tasks.
- Arrange the Steps Logically – Organize the steps in the correct sequence.
- Create an Algorithm – Write a step-by-step solution to achieve the goal.
- Draw a Flowchart – Represent the process visually to check the workflow.
- Write the Program – Convert the algorithm into instructions that the machine can understand and execute.
- Test and Improve – Check whether the program works correctly and make necessary improvements.
What is an Algorithm?
- An algorithm is a step-by-step set of instructions used to solve a problem or complete a task.
- It helps us perform tasks in the correct order to achieve the desired result.
- Before creating a computer program, we first write an algorithm to plan the solution.
An algorithm is a plan that tells us what to do, step by step.
Example: Algorithm to Make Mango Juice
- Wash the mangoes properly.
- Peel and cut the mangoes into pieces.
- Put the mango pieces into a mixer/blender.
- Add water and sugar as needed.
- Switch on the mixer and blend the ingredients until smooth.
- Pour the mango juice into a glass.
- Mango juice is ready.
Activity (Do It Yourself)
Write Algorithm for making instant noodles.
Write Algorithm for turning on a computer
Important Note
- Different people may write algorithms in different ways.
- The steps can vary, but the final goal remains the same.
- An algorithm should be clear, logical, and easy to follow.
What is a Flowchart?
- A flowchart is a graphical or pictorial representation of an algorithm.
- It uses different symbols, shapes, and arrows to represent the steps of a process.
- Flowcharts help us understand, analyze, and communicate a process more easily.
- They show the sequence of steps in a clear and visual manner, making complex tasks easier to understand.
Common Flowchart Symbols
| Symbol | Purpose |
| Terminal (Start/End) | Indicates the beginning or end of a flowchart. |
| Input/Output | Represents input given to or output received from a process. |
| Process | Represents an action, instruction, or operation. |
| Decision | Represents a condition that requires a Yes/No or True/False decision. |
| Arrow (Connector) | Shows the direction and flow of the process. |
How to make Flowchart to represent Algorithm
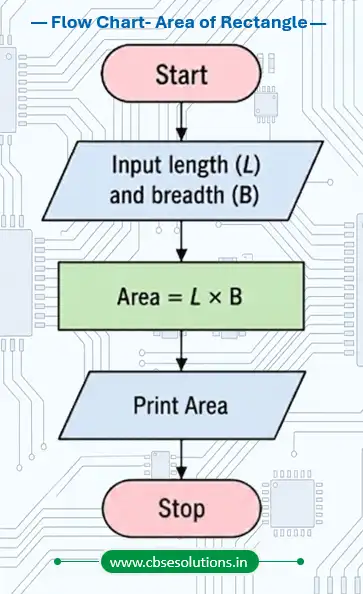
Example: Find the Area of a Rectangle
Algorithm
Step 1: Start.
Step 2: Input the length (L) of the rectangle.
Step 3: Input the width (W) of the rectangle.
Step 4: Calculate the area of the rectangle using Area = L × W.
Step 5: Display the area.
Step 6: End.
Flow Chart
Activity (Do It Yourself)
Write Algorithm and Flow Chart to:
- Add two numbers
- Check a number is even or odd
- Display largest among three numbers
- Check a number is prime or not
- How traffic signal works
Introduction to Python
What is Program?
A computer program is a set of instructions that tells a computer how to perform a specific task. These instructions are written by a programmer using a programming language.
What is Python?
- Python is a programming language created by Guido Van Rossum in 1991.
- It is widely used for developing software and websites, analyzing data, performing scientific calculations, and building Artificial Intelligence (AI) applications.
Why Python for AI ? Characteristics of Python
- Easy to Learn and Use
Python has a simple and easy-to-read syntax, making it beginner-friendly and easy to maintain. - Large Standard Library
Python provides many built-in libraries and functions that help solve a wide variety of problems quickly. - Interactive Mode
Python allows users to run and test code line by line, making learning, testing, and debugging easier. - Portable and Compatible
Python programs can run on different operating systems, such as Windows, Linux, and macOS, with little or no modification. - Extensible
Python can be combined with code written in other languages, allowing developers to add extra features and improve performance. - Database Support and Scalability
Python works with many databases and can be used to develop both small applications and large-scale projects.
Application of Python
- Web Development: Instagram, Spotify, Netflix
- Business Applications: Odoo, Triton, accounting software
- Games and 3D Graphics: Battlefield 2, The Sims 4, Blender
- Database Access: MySQL, PostgreSQL, Oracle databases
- Software Development: Buildbot, SCons, automated test scripts
- Desktop GUI Applications: Deluge, BitTorrent, desktop calculators
Download and Installing Python for use
How to Download Python?
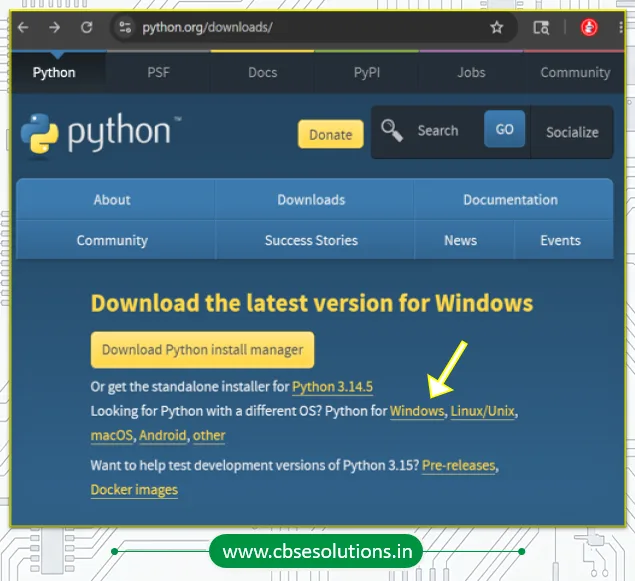
- Open a web browser and visit www.python.org.
- Click on the Downloads menu.
- Select your operating system, such as Windows, Linux/Unix, macOS, or Android.
- For example, if you are using Windows, click on Windows.
- Download the appropriate installer, such as Windows Installer (64-bit) or Windows Installer (32-bit).
- Python will be downloaded to your computer and will be ready for installation.
How to Install Python?
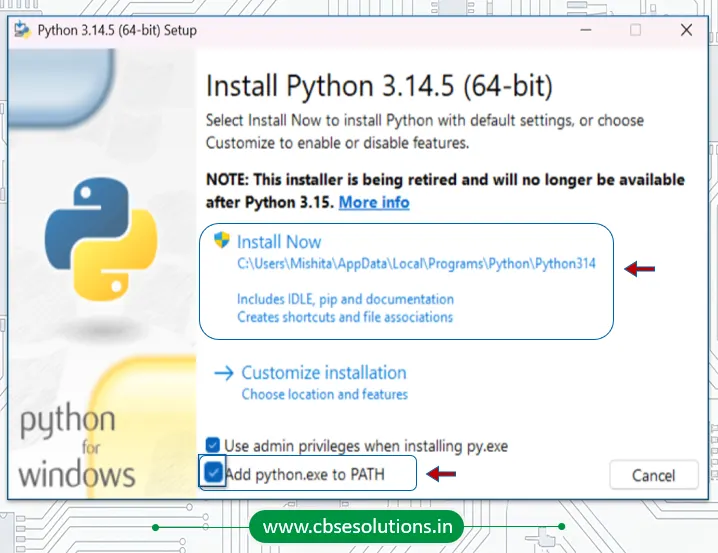
- Double-click the Python installer that you have downloaded.
(For example, Python 3.14.5 (64-bit)). - On the installation window, select Add Python.exe to PATH.
- Click Install Now.
- If a User Account Control message appears, click Yes to allow Windows to install Python.
- Wait for the installation process to complete.
- Python and IDLE will be installed on your computer and ready to use.
Python IDE (IDLE)
- When Python is installed on a computer, an IDE called IDLE is also installed.
- IDLE (Integrated Development and Learning Environment) is the standard Python development environment. It provides a single interface to write, run, edit, and debug Python programs.
- IDLE makes programming easier, especially for beginners.
How to Start Python IDLE?
- Click Start Menu.
- Search for IDLE.
- Click IDLE (Python 3.x).
- The IDLE window opens.
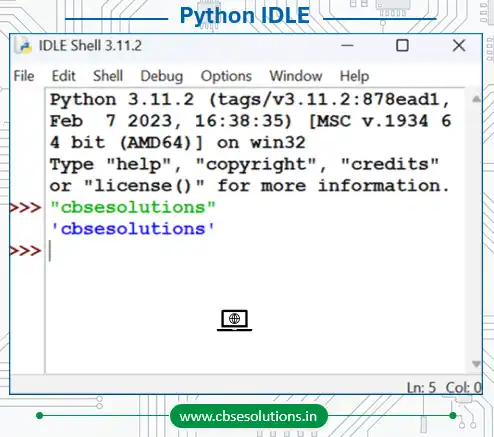
Note: When we open IDLE, it starts in Interactive Mode by default, and the window that opens is called the Python Shell. It allows us to enter Python commands and see the results immediately.
Working Modes of Python
Python can be used in two modes:
- Interactive Mode
- Script Mode
Interactive Mode
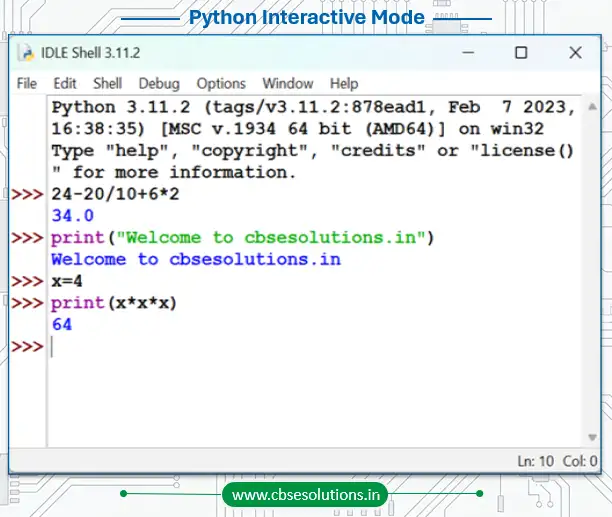
- Interactive Mode opens by default when IDLE is started.
- In this mode, commands are entered in the Python Shell.
- Python executes each command immediately and displays the result.
- It is convenient for learning Python, performing quick calculations, and testing small pieces of code.
Script Mode
- In this mode, a complete program is written in the Editor Window.
- The program is saved as a Python file (.py).
- The entire program is executed at once when it is run.
- It is convenient for creating longer and more complex programs.
- To work with Script mode, click on File -> New File
Working in Script Mode
- Click File → New File to open a new Editor Window.
- Type the Python statements required to solve the problem.
- Save the program using File → Save and give it a meaningful name.
- Run the program using Run → Run Module.
- The output of the program will be displayed in the Python Shell.
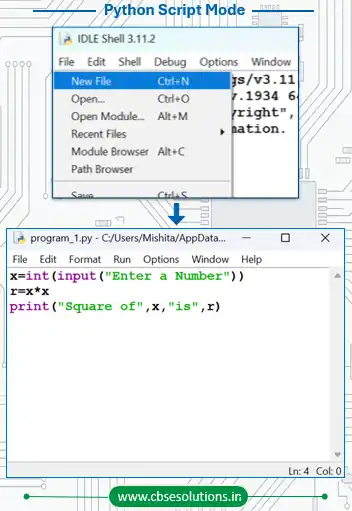
Python Script/Program: Python statements written in a particular sequence to solve a problem is known as Python Script/Program.
Understanding First Python Program
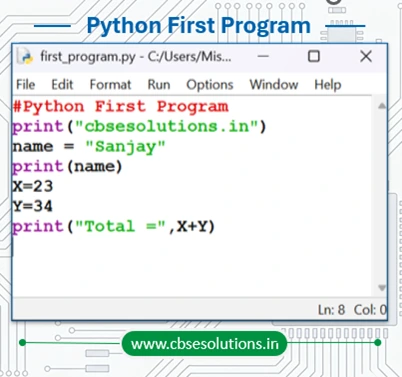
- # Python First Program is a comment used to describe the purpose of the program. Comments are ignored during program execution.
- print(“cbsesolutions.in”) displays the text cbsesolutions.in on the screen.
- print() is a built-in Python function used to display output.
- name = “Sanjay” creates a variable named name and stores the string value “Sanjay” in it.
- print(name) displays the value stored in the variable name.
- X = 23 and Y = 34 assign the integer values 23 and 34 to the variables X and Y respectively.
- print(“Total =”, X + Y) calculates the sum of X and Y and displays the result along with the text “Total =”.
- The + operator is an arithmetic operator used to add two numbers.
Components of Python Program
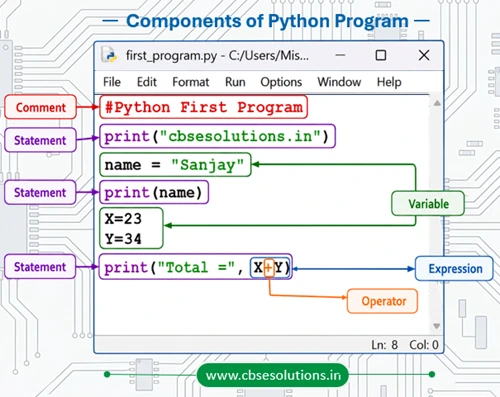
Python Statements
A statement is an instruction written in a Python program that tells the computer to perform a specific task. Python executes statements one by one to produce the desired output.
Examples:
name = “Sanjay”
print(name)
X = 23
Multi-line Statements
Sometimes, long statements can be written across two or more lines. Such statements are called multi-line statements. Python allows multi-line statements using:
- Continuation character (\)
- Parentheses (())
- Square brackets ([])
- Braces ({})
- Semicolon (;)
Example:
total = 10 + 20 + 30 + \
40 + 50
Output:
150
In the above example, the statement is written on two lines using the continuation character (\).
Example:
message = (“Artificial Intelligence ” \
“is an exciting field.”)
print(message)
Output:
Artificial Intelligence is an exciting field.
Types of Multiline Statements
| Type of Multi-line Statement | Usage | Example |
| Using Continuation Character (\) | Used to continue a statement on the next line. | result = 10 + 20 + 30 + \ 40 + 50 print(result) Output: 150 |
| Using Parentheses () | Statements inside parentheses can span multiple lines without using \. | total_marks = ( 85 + 90 + 88 + 92 + 95 ) print(total_marks) Output:450 |
| Using Square Brackets [] | Lists can be written across multiple lines for better readability. | subjects = [ “English”, “Maths”, “Science”, “Computer” ] print(subjects) Output: [‘English’, ‘Maths’, ‘Science’, ‘Computer’] |
| Using Braces {} | Sets or dictionaries can be spread across multiple lines. | colors = { “Red”, “Green”, “Blue”, “Yellow” } print(colors) Output: {‘Red’, ‘Green’, ‘Blue’, ‘Yellow’} |
| Using Semicolons (;) | Multiple statements can be written on a single line. | name = “Aman”; age = 15; grade = “10th” print(name, age, grade) Output: Aman 15 10th |
Comments in Python
- Comments are pieces of text written inside a program.
- They are used to explain what a program or a block of code does.
- Comments do not affect the execution or output of the program.
- In Python, comments start with the # (hash) symbol.
Single-line Comment
A single-line comment is used to write a short note or explanation on a single line. It begins with the # symbol.
Example:
# Displaying a welcome message
print(“Welcome to Python”)
Output:
Welcome to Python
Multi-line Comment
A multi-line comment is used when the explanation is too long to fit on a single line. In Python, multi-line comments can be written using triple quotes (”’ ”’ or “”” “””).
Example:
“””
This program displays
a welcome message
on the screen.
“””
print(“Welcome to Python”)
Output:
Welcome to Python
Python Keywords
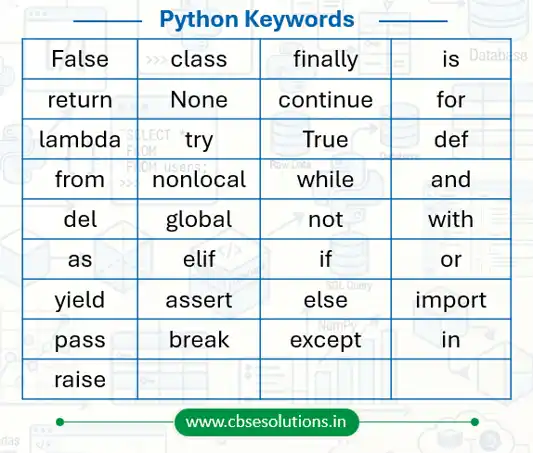
- Keywords are reserved words that have special meanings and predefined purposes in Python.
- Keywords cannot be used as variable names or identifiers.
- Python is case-sensitive, so keywords must be written exactly as defined.
Common Python Keywords
Identifiers
An identifier is a name given to entities like class, functions, variables, etc. It helps to differentiate one entity from another.
Rules for Identifiers:
- Composition: Identifiers can be a combination of letters in lowercase (a to z) or uppercase (A to Z) or digits (0 to 9) or an underscore _.
- Starting Character: An identifier cannot start with a digit. 1variable is invalid, but variable1 is perfectly fine.
- Keywords: Keywords cannot be used as identifiers.
- Special Symbols: We cannot use special symbols like !, @, #, $, % etc. in our identifier.
- Length: Identifier can be of any length.
- Case Sensitivity: Python is a case-sensitive language. This means Variable and variable are not treated the same.
- Meaningful Naming: Always name identifiers so that they make sense. While a statement like c = 10 is valid, writing count = 10 makes much more sense and makes it easier to figure out what the code does, even when you look back at it after a long gap.
- Multi-word Separation: Multiple words within a name can be separated using an underscore—for example, this_is_a_long_variable.
Variables
A variable is a named memory location used to store data in a program. It acts like a container that holds a value, which can be changed later if needed.
Example:
x = 42
y = 35
In the above example:
- x and y are variable names.
- 42 and 35 are the values stored in the variables.
- Python reserves memory to store these values.
- The values can be used or changed later in the program.
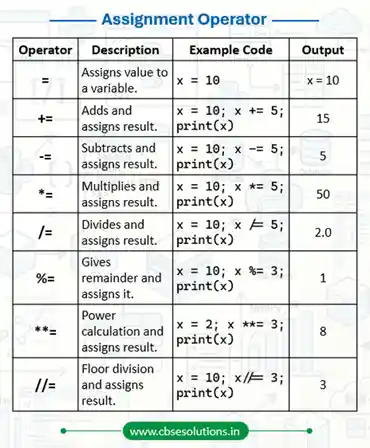
Note: The assignment operator (=) is used to assign a value to a variable.
Example:
x = 42
Here, the value 42 is assigned to the variable x.
How to change value of a variable?
name = “cbsesolutions.in”
print(name)
name = “best for cbse skill education”
print(name)
Output:
cbsesolutions.in
best for cbse skill education
How to Assign Same value to Different variables
x = y = z = 10
print(x,y,z)
Output:
10 10 10
In the above example:
The statement x = y = z = 10 assigns the value 10 to all three variables: a, b, and c.
All variables refer to the same value (10) in memory.
How to Assigning Different Values to Different Variables
x, y, z = 10, 20, 30
print(x,y,z)
Output:
10 20 30
In the above example:
The statement x,y,z = 10,20,30 assigns x = 10, y = 20, z = 30 (values are assigned in order)
Input and Output in Python
How to Input a value in a variable in Python
- In Python, the input() function is used to take input from the user through devices like a keyboard.
- By default, all input values are treated as strings (text).
- If required, we can convert the input into other data types like int, float, etc., using type conversion functions.
Examples
name = input(“Enter your full name: “) # stored as string
marks = input(“Enter your marks: “) # stored as string
marks = int(input(“Enter your marks: “)) # converted to int
Output in Python
- Python uses the print() function to display output on the screen.
- It can display text, variables, or the result of expressions.
- The expression is evaluated first, and then the result is shown as output.
Examples of Input and Output in python
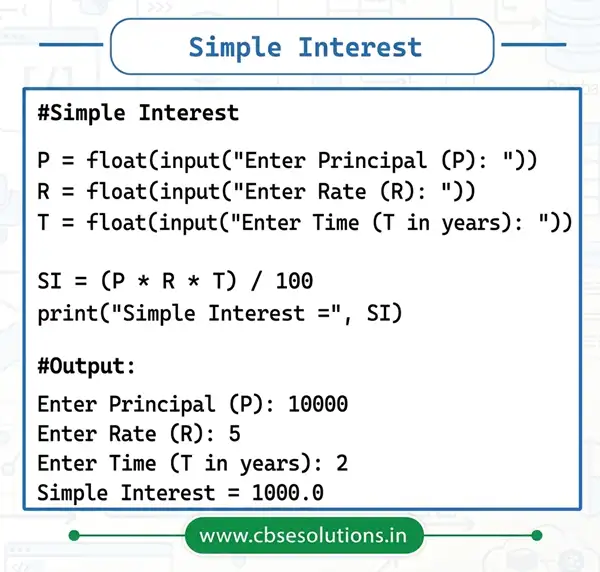
Write a program to accept Principal, Rate, and Time. Calculate and display Simple Interest.
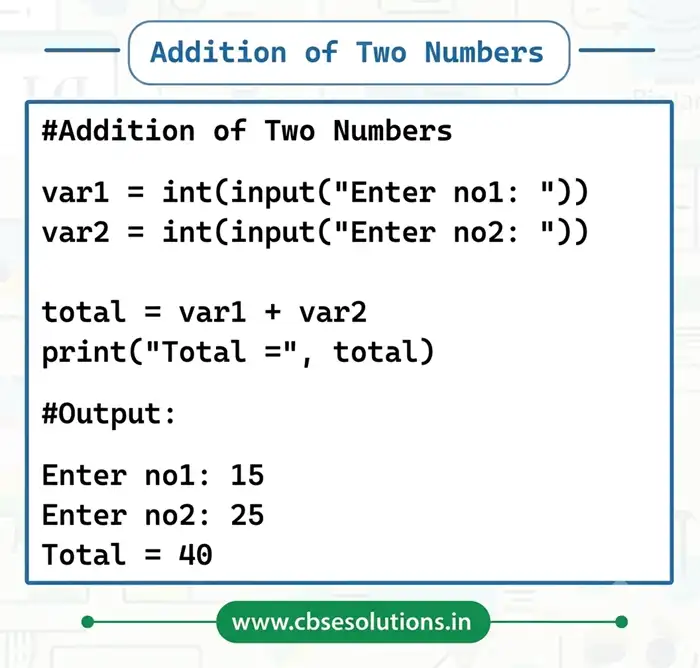
Write a program to find addition of two numbers
Data Types in Python
- Every value in Python has a specific data type.
- Data type defines what kind of data a variable can store and what operations can be performed on it.
| Type | Data Type | Use / Description | Example |
| Number | Integer (int) | Stores whole numbers without a decimal point. | age = 15 |
| Float (float) | Stores numbers with a decimal point. | marks = 89.5 | |
| Missing value | None | Represents the absence of a value. | result = None |
| Sequence | String (str) | Stores text or a sequence of characters enclosed in quotes. | name = “Sanjay” |
| List (list) | Stores an ordered collection of multiple values. Lists are mutable (can be changed). | subjects = [“Python”, “AI”, “Math”] | |
| Tuple (tuple) | Stores an ordered collection of values that cannot be changed. | student = (101, “Sanjay”, 15) | |
| Mapping | Set (set) | Stores an unordered collection of unique values. Duplicate values are automatically removed. | numbers = {1, 2, 2, 3, 3} |
| Dictionary (dict) | Stores data as key-value pairs for quick retrieval. | student = {“name”:”Sanjay”, “age”:15} |
Type Conversion in Python
- Type conversion refers to converting one type of data to another type.
- Type conversion can happen in two ways:
- Explicit conversion
- Implicit conversion
Explicit Conversion
- Explicit conversion also refers to type casting.
- In explicit conversion, programmer convert the data type of data to required data type.
- We use the predefined functions like int(), float(), str(), chr() etc to perform explicit type conversion.
Syntax
required_datatype(expression)
Example: Combining Roll Number and Student Name
roll_no = 25
student_name = “Riya”
print(“roll_no:”, type(roll_no))
print(“student_name:”, type(student_name))
# Converting integer to string
roll_no = str(roll_no)
print(“roll_no after conversion:”, type(roll_no))
student_info = roll_no + ” – ” + student_name
print(“Student Info:”, student_info)
print(“student_info:”, type(student_info))
Output
roll_no: <class ‘int’>
student_name: <class ‘str’>
roll_no after conversion: <class ‘str’>
Student Info: 25 – Riya
student_info: <class ‘str’>
| Example Code | Sample Output | Explanation |
| python<br>price = 50<br>item = ” Pens”<br>print(str(price) + item) | 50 Pens | str(price) converts the integer value into a string. It can then be combined with another string using the + operator. |
| python<br>marks = 89.7<br>bonus = 5<br>print(int(marks) + bonus) | 94 | int(marks) converts the float value into an integer by removing the decimal part. The addition is then performed. |
| python<br>count = 3<br>status = False<br>print(bool(count) + status) | 1 | bool(count) converts the integer into a Boolean value. Since count is non-zero, it becomes True (1). True + False gives 1. |
Implicit conversion
- Implicit type conversion means Python automatically converts one data type into another without using any special function
Example:
# Code to calculate Simple Interest
principal = 3500
rate_of_interest = 6.2
time_period = 5
simple_interest = (principal * rate_of_interest * time_period) / 100
print(“datatype of principal amount : “, type(principal))
print(“datatype of rate of interest : “, type(rate_of_interest))
print(“value of simple interest : “, simple_interest)
print(“datatype of simple interest : “, type(simple_interest))
When we run the above program, the output will be:
datatype of principal amount : <class ‘int’>
datatype of rate of interest : <class ‘float’>
value of simple interest : 1085.0
datatype of simple interest : <class ‘float’>
| Example Code | Sample Output | Explanation |
| a = 15 b = “World” print(a + b) | TypeError: unsupported operand type(s) for +: ‘int’ and ‘str’ | The output shows an error because Python does not allow addition of integer and string directly without type conversion. |
| c = “Hi” n = 4 print(c * n) | HiHiHiHi | The string is repeated 4 times because the * operator repeats strings when used with an integer. |
| x = False y = 8 print(x + 10) | 10 | The boolean value False is treated as 0, so 0 + 10 = 10. |
| m = True n = 12 print(n – m) | 11 | The boolean value True is treated as 1, so 12 – 1 = 11. |
Operators in Python
- An operator is a symbol used to perform mathematical or logical operations on values.
- The values on which an operator works are called operands.
Types of Operators
- Arithmetic operator
- Comprision (Relational) operator
- Assignment operator
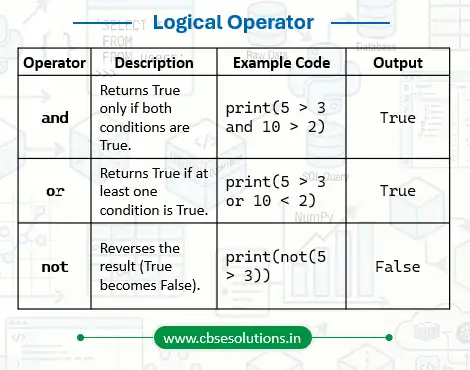
- Logical operator
- Identity operator
- Membership operator
- operator
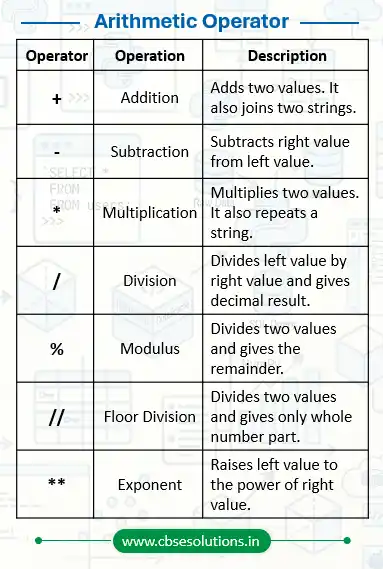
Note: As per your syllabus of class 9 AI you have to learn only four operators as give below:
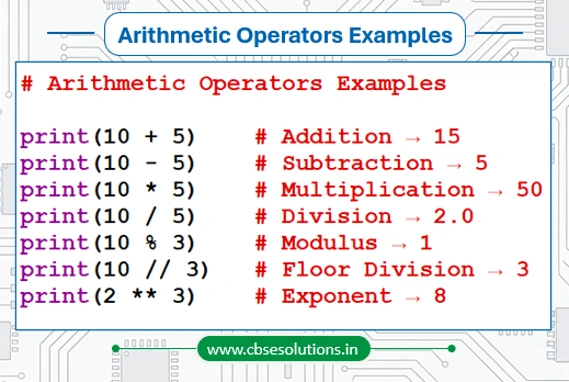
Arithmetic Operators
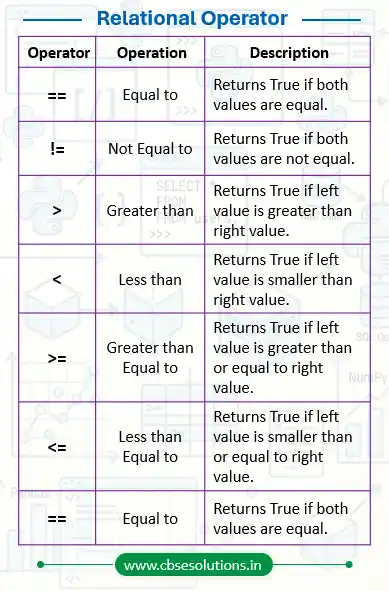
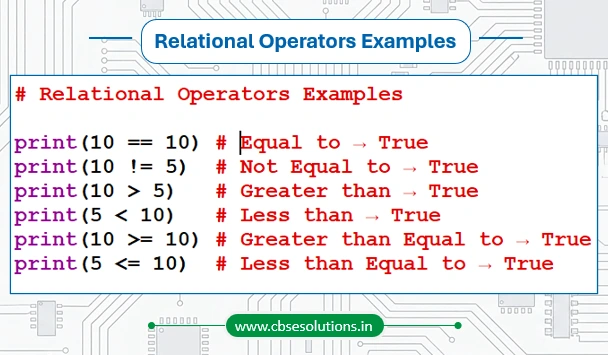
Comparision (Relational) Operators
Logical Operator
Assignment Operator
Do it by yourself
- Write a program to find average of five numbers
- Write a program to find cube of a given number.
- Write a program to convert oC to oF
- Write a program to swap values of two variables
Flow of Control and Condition
Flow of Control
- The sequence in which program statements are executed is called the flow of control.
- sometimes we need the program to make decisions or repeat certain tasks. To do this, we use flow control statements.
- There are three main flow control statements in Python.
- if statement
- for statement
- while statement
If Statement (Decision Making Statement)
In programming, a computer often needs to make decisions. Based on certain conditions, it decides which instructions should be executed next.
Decision-making statements help a program choose different actions according to different situations. Python provides the following decision-making statements:
- if statement
- if…else statement
- if…elif…else statement
- Nested if statement
if Statement
The if statement checks a condition. If the condition is True, the statements inside the if block are executed. If the condition is False, the statements are skipped.
Syntax
if condition:
statement(s)
Example
num = int(input(“Enter a number”))
if num > 0:
print(“Positive Number”)
print(“Program Ended”)
Output
Positive Number
Program Ended
Remember: The statements inside an if block must be indented.
if…else Statement
Sometimes we want one action to happen when a condition is True and another action when it is False. In such cases, we use the if…else statement.
Syntax
if condition:
statement(s)
else:
statement(s)
Example
age = int(input(“Enter your age”))
if age >= 18:
print(“You can vote”)
else:
print(“You cannot vote”)
Output
You cannot vote
if…elif…else Statement
When there are multiple conditions to check, we use if…elif…else. The word elif means else if.
Syntax
if condition1:
statement(s)
elif condition2:
statement(s)
else:
statement(s)
Example
marks = int(input(“Enter your marks”))
if marks >= 90:
print(“Grade A+”)
elif marks >= 75:
print(“Grade A”)
else:
print(“Grade B”)
Output
Grade A
Explanation
The first condition is False, but the second condition is True, so the elif block is executed.
Nested if Statement
When an if statement is placed inside another if statement, it is called a Nested if Statement.
Example
num = float(input(“Enter a number”))
if num >= 0:
if num == 0:
print(“Zero”)
else:
print(“Positive Number”)
else:
print(“Negative Number”)
Output
Positive Number
Do it yourself
- Write a program to check a number is even or odd
- Write a program to display largest among three numbers
The for Loop
A for loop is used when we want to repeat a block of code multiple times.
A for loop is mainly used to iterate over a sequence, such as a list or tuple. It takes each item from the sequence one by one and executes the associated block of code for each item until the sequence ends.
A sequence is an ordered collection of items, such as a list, string, or range of numbers.
Syntax
for variable in sequence:
statement(s)
Example 1: Printing Numbers
for num in [1, 2, 3, 4, 5]:
print(num)
Output
1
2
3
4
5
Example 2: Finding the Sum of Numbers
numbers = [6, 5, 3, 8, 4, 2, 5, 4, 11]
total = 0
for num in numbers:
total = total + num
print(“The sum is”, total)
Output
The sum is 48
The range() Function
- The range() function is a built-in function in Python used to generate a sequence of integers within a specified range.
- It is commonly used with for loop to control how many times the loop should execute.
Syntax
range(start, stop, step)
Parameters of range()
- start → Specifies the starting value of the sequence. By default, it is 0.
- stop → Specifies the ending value of the sequence (not included in the output).
- step → Specifies the difference between consecutive values. By default, it is 1.
Examples
Example 1: Using only stop
for i in range(5):
print(i)
Output
0
1
2
3
4
Example 2: Using start and stop
for i in range(2, 6):
print(i)
Output
2
3
4
5
Example 3: Using start, stop, and step
for i in range(2, 11, 2):
print(i)
Output
2
4
6
8
10
The while Loop
A while loop is used to repeatedly execute a block of code as long as a given condition remains True.
A while loop is useful when we do not know in advance how many times the loop needs to run.
Syntax
while condition:
statement(s)
How a while Loop Works
In a while loop, the condition (test expression) is checked first.
- If the condition is True, the statements inside the loop are executed.
- After executing the loop body once, the condition is checked again.
- The loop continues to execute as long as the condition remains True.
- When the condition becomes False, the loop stops.
Example
i = 1
while i <= 5:
print(i)
i = i + 1
Output
1
2
3
4
5
Example: Sum of Natural Numbers
n = 10
total = 0
i = 1
while i <= n:
total = total + i
i = i + 1
print(“The sum is”, total)
Output
The sum is 55
Do it yourself
- Write a program to find numbers which are divisible by 7 and multiple of 5 between 1200 and 2200.
- Write a program to find the whether a number is prime or not using ‘while’ loop.
break statement in Python
The break statement is used to exit a loop immediately, even if the loop condition is still True. When a break statement is encountered, the loop stops and control moves to the first statement after the loop.
Example
for i in range(1, 10):
if i == 4:
break
print(i)
Output
1
2
3
The continue Statement
The continue statement is used to skip the remaining statements of the current iteration and move directly to the next iteration of the loop.
Example
for i in range(1, 6):
if i == 3:
continue
print(i)
Output
1
2
4
5
Introduction to List
- A List is collection of multiple values stored in one place under a single name.
- The values stored in a list are called elements or items.
- All elements of list are separated by commas.
- A list is enclosed within square brackets [ ].
- A list can have any number of items and may of different types (integer, float, string etc.)
- List is ordered, which means items are stored in a specific sequence.
- List is mutable, which means their contents can be changed after creation.
Creating List
Creating Empty List
# Empty list
empty_list = []
print(empty_list)
Output
[]
Creating List of Integers
# list1 stores prime numbers
list1 = [2, 3, 5, 7, 11, 13]
print(list1)
Output
[2, 3, 5, 7, 11, 13]
Creating List of Strings
# list2 stores fruit names
list2 = [‘Apple’, ‘Mango’, ‘Banana’, ‘Orange’]
print(list2)
Output
[‘Apple’, ‘Mango’, ‘Banana’, ‘Orange’]
List with Mixed Data Types
# list3 stores different data types
list3 = [101, 85.6, “Python”]
print(list3)
Output
[101, 85.6, ‘Python’]
Accessing Elements of a List
Python provides two ways to access individual elements of a list:
- Positive Indexing (List Index)
- Negative Indexing
Positive Indexing (List Index)
- Each item in a list has a position called an index.
- Indexing starts from 0.
- The first item has index 0, the second item has index 1, and so on.
- To access an item, we use the index operator [ ].
Negative Indexing
Python also allows negative indexing to access elements from the end of the list.
- -1 refers to the last item.
- -2 refers to the second last item and so on.
| Item | Apple | Mango | Orange | Banana |
| Index | 0 | 1 | 2 | 3 |
| Negative Index | -4 | -3 | -2 | -1 |
Example: Accessing Elements
fruits = [“Apple”, “Mango”, “Orange”, “Banana”]
print(fruits[0])
print(fruits[2])
print(fruits[-1])
print(fruits[-2])
Output
Apple
Orange
Banana
Orange
| Task | Sample Code and Output |
| Accessing Elements Using List Index | fruits = [“Apple”, “Mango”, “Orange”, “Banana”] print(fruits[0]) print(fruits[2]) Output: Apple Orange |
| Using a Non-Integer Index | fruits = [“Apple”, “Mango”, “Orange”, “Banana”] print(fruits[2.0]) Output: TypeError: list indices must be integers or slices, not float |
| Accessing Elements in a Nested List | student = [“Rahul”, [85, 90, 88]] print(student[0][2]) print(student[1][1]) Output: h 90 |
| Accessing Elements Using Negative Indexing | colors = [“Red”, “Blue”, “Green”, “Yellow”] print(colors[-1]) print(colors[-4]) Output: Yellow Red |
Adding Elements to a List
Elements can be added to a list using the following methods:
- append()
- insert()
- extend()
append() Method
- The append() method adds a single element to the end of the list.
- append() adds only one element at a time
Example
numbers = [10, 20, 30]
print(“Original List:”, numbers)
numbers.append(40)
print(“Updated List:”, numbers)
Output
Original List: [10, 20, 30]
Updated List: [10, 20, 30, 40]
insert() Method
- The insert() method adds an element at a specified position in the list.
- insert() requires two arguments:
- Position (index)
- Value to be inserted
Syntax
list_name.insert(index, value)
Example
numbers = [10, 20, 30]
print(“Original List:”, numbers)
numbers.insert(1, 15)
print(“Updated List:”, numbers)
Output
Original List: [10, 20, 30]
Updated List: [10, 15, 20, 30]
extend() Method
- The extend() method is used to add multiple elements at the end of a list.
- The new elements are added at the end of the list.
Example
numbers = [10, 20, 30]
print(“Original List:”, numbers)
numbers.extend([40, 50, 60])
print(“Updated List:”, numbers)
Output
Original List: [10, 20, 30]
Updated List: [10, 20, 30, 40, 50, 60]
Removing Elements from a List
Elements can be removed from a list using the following methods:
- remove()
- pop()
remove() Method
- The remove() method removes the specified element from the list.
- If the element appears multiple times, only the first occurrence is removed.
- An error occurs if the specified element is not present in the list.
Syntax
list_name.remove(value)
Example
fruits = [“Apple”, “Mango”, “Orange”, “Banana”]
print(“Original List:”, fruits)
fruits.remove(“Orange”)
print(“Updated List:”, fruits)
Output
Original List: [‘Apple’, ‘Mango’, ‘Orange’, ‘Banana’]
Updated List: [‘Apple’, ‘Mango’, ‘Banana’]
Using pop() Method
- The pop() method removes and returns an element from the list.
- If no index is specified, pop() removes the last element of the list.
Syntax
list_name.pop(index)
Example 1: Removing an Element at a Specific Position
fruits = [“Apple”, “Mango”, “Orange”, “Banana”]
print(“Original List:”, fruits)
fruits.pop(1)
print(“Updated List:”, fruits)
Output
Original List: [‘Apple’, ‘Mango’, ‘Orange’, ‘Banana’]
Updated List: [‘Apple’, ‘Orange’, ‘Banana’]
Example 2: Removing the Last Element
fruits = [“Apple”, “Mango”, “Orange”, “Banana”]
fruits.pop()
print(fruis)
Output
[‘Apple’, ‘Mango’, ‘Orange’]
Slicing of a List
- Slicing is used to access a specific element from a list by specifying a range of indexes.
- In Python, slicing is performed using the colon (:) operator.
Syntax
list_name[start : end]
- start → Starting index (included)
- end → Ending index (not included)
Common Forms of Slicing
| Expression | Description |
| list[:end] | Elements from the beginning up to end-1 |
| list[start:] | Elements from start to the end |
| list[start:end] | Elements from start to end-1 |
| list[:] | Creates a copy of the entire list |
| list[::-1] | Returns the list in reverse order |
Examples of List Slicing
Consider the following list:
colors = [“Red”, “Blue”, “Green”, “Yellow”, “Black”, “White”]
| Task | Sample Code and Output |
| Slicing a Range of Elements | colors = [“Red”, “Blue”, “Green”, “Yellow”, “Black”, “White”] print(colors[1:4]) Output: [‘Blue’, ‘Green’, ‘Yellow’] |
| Accessing Elements from a Specific Index to the End | colors = [“Red”, “Blue”, “Green”, “Yellow”, “Black”, “White”] print(colors[3:]) Output: [‘Yellow’, ‘Black’, ‘White’] |
| Printing the Entire List | colors = [“Red”, “Blue”, “Green”, “Yellow”, “Black”, “White”] print(colors[:]) Output: [‘Red’, ‘Blue’, ‘Green’, ‘Yellow’, ‘Black’, ‘White’] |
| Slicing Using Negative Indexes | colors = [“Red”, “Blue”, “Green”, “Yellow”, “Black”, “White”] print(colors[-4:-1]) Output: [‘Green’, ‘Yellow’, ‘Black’] |
| Accessing Elements from the Beginning Using Negative Index | colors = [“Red”, “Blue”, “Green”, “Yellow”, “Black”, “White”] print(colors[:-2]) Output: [‘Red’, ‘Blue’, ‘Green’, ‘Yellow’] |
| Printing the List in Reverse Order | colors = [“Red”, “Blue”, “Green”, “Yellow”, “Black”, “White”] print(colors[::-1]) Output: [‘White’, ‘Black’, ‘Yellow’, ‘Green’, ‘Blue’, ‘Red’] |
List Methods and Built-in Functions
| Method / Function | Description | Example |
| len() | Returns the total number of elements in the list. | list1 = [“CBSE”, “Solutions”, “Python”] print(len(list1)) Output: 3 |
| append() | Adds a single element at the end of the list. | list1 = [“CBSE”, “Solutions”] list1.append(“Notes”) print(list1) Output: [‘CBSE’, ‘Solutions’, ‘Notes’] |
| extend() | Adds all elements of another list to the end. | list1 = [“CBSE”] list1.extend([“Solutions”, “Python”]) print(list1) Output: [‘CBSE’, ‘Solutions’, ‘Python’] |
| insert() | Inserts an element at a specific position. | list1 = [“CBSE”, “Python”] list1.insert(1, “Solutions”) print(list1) Output: [‘CBSE’, ‘Solutions’, ‘Python’] |
| count() | Returns number of occurrences of an element. | list1 = [“CBSE”, “Python”, “CBSE”] print(list1.count(“CBSE”)) Output: 2 |
| index() | Returns index of first occurrence of an element. | list1 = [“CBSE”, “Solutions”, “Python”] print(list1.index(“Python”)) Output: 2 |
| remove() | Removes first occurrence of an element. | list1 = [“CBSE”, “Solutions”, “Python”, “Solutions”] list1.remove(“Solutions”) print(list1) Output: [‘CBSE’, ‘Python’, ‘Solutions’] |
| pop() | Removes and returns element at given index (last if not specified). | list1 = [“CBSE”, “Solutions”, “Python”] print(list1.pop()) print(list1) Output: Python [‘CBSE’, ‘Solutions’] |
| reverse() | Reverses the order of elements in the list. | list1 = [“CBSE”, “Solutions”, “Python”] list1.reverse() print(list1) Output: [‘Python’, ‘Solutions’, ‘CBSE’] |
| sort() | Sorts the list in ascending order (in-place). | list1 = [“Python”, “CBSE”, “AI”] list1.sort() print(list1) Output: [‘AI’, ‘CBSE’, ‘Python’] |